
路由配置 | SooMooc 直播平台
前端所有代码已经同步到 GitHub Repo: EthanLuu/soomooc: React + TypeScript 实践,在线教学直播平台。 (github.com)
作为一款 SPA 应用,我们通过路由对页面显示的内容进行动态调整。
react-router安装
由于我们是在 Web 中进行开发,所以安装的是 react-router-dom 库。
# 安装 react-router-dom
yarn add react-router-dom
# 适配 TypeScript
yarn add @types/react-router-dom -D
组件调整
在上一次写主页的时候,我们把主页的组件组成直接写在了 App.tsx 中,显然这个方式并不好。
我们希望以路由的方式对页面显示的内容进行控制。

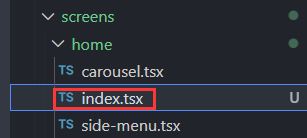
原来的 Content 这个命名也不够标准,我们将其名字从 Content.tsx 改成 index.tsx,表示主页的界面。
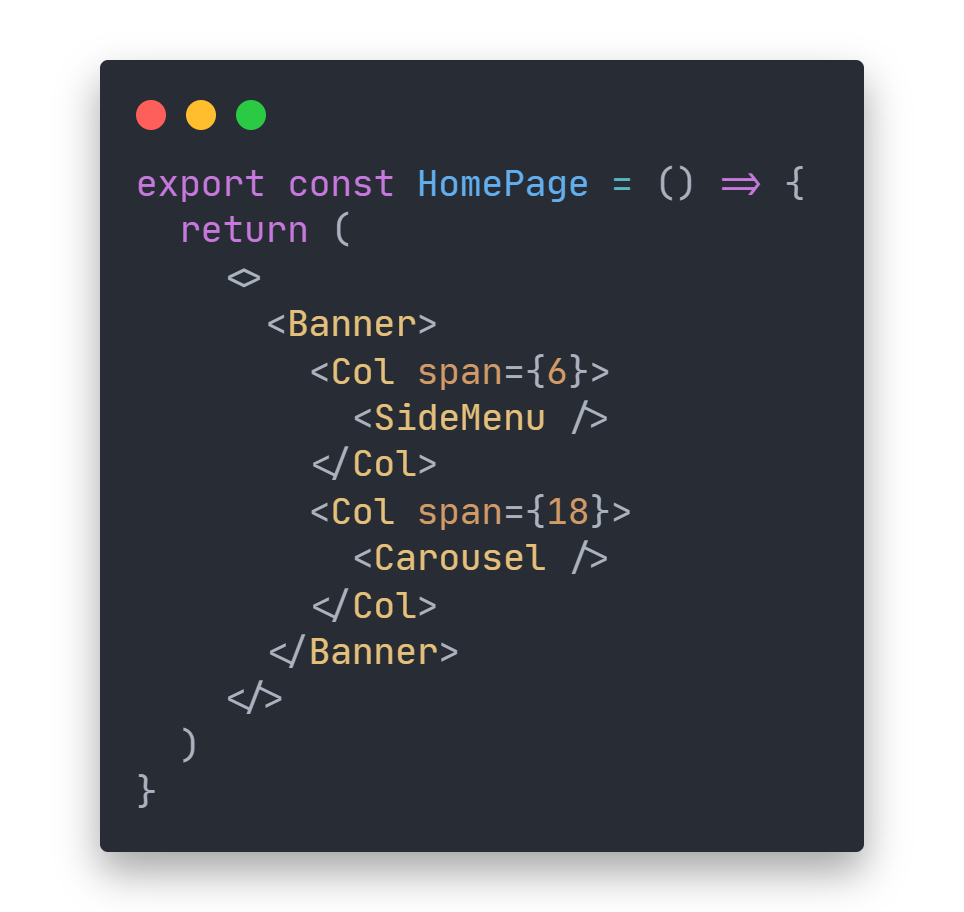
同时,将其导出的组件名称修改为 HomePage,同时把原来外面那个 Container 组件去掉,我们将其作为公共组件直接写到 App.tsx 中去。
基础路由配置
现在就可以根据我们当前已经写的界面来修改根组件啦!
整理下我们现在有的几个界面:
- 首页界面,
<HomePage />组件 - 写一个注册界面
<LoginScreen />,直接返回一个 H1 标题。 - 写一个登陆界面
<RegisterScreen />,直接返回一个 H1 标题。 - 写一个
NotFoundPage组件,作为 404 界面,当输入的路由无法匹配时显示该界面。
import { Result, Button } from 'antd'
import { Link } from 'react-router-dom'

export const NotFoundPage = () => {
  return (
    <Result
      status="404"
      title="404"
      subTitle="未知资源"
      extra={
        <Button type="primary">
          <Link to={'/'}>返回首页</Link>
        </Button>
      }
    />
  )
}
引入 BrowserRouter 包裹页面,并且新建路由项 Route,将其指向根目录并且将需要显示的组件设定为 HomePage 组件。
似乎给
BrowserRouter起个别名Router已经成了传统,那我们就干脆继承过来吧。
import './App.css'
import { ErrorBoundary } from 'components/error-boundary'
import { FullPageErrorFallback } from 'components/lib'
import { BrowserRouter as Router, Route, Switch } from 'react-router-dom'
import { HomePage } from 'screens/home'
import { Header } from 'components/header'
import { Footer } from 'components/footer'
import { NotFoundPage } from 'screens/404'
import styled from '@emotion/styled'
import { LoginPage } from 'screens/login'
import { RegisterPage } from 'screens/register'

function App() {
  return (
    <div className="App">
      <ErrorBoundary fallbackRender={FullPageErrorFallback}>
        <Router>
          <Header />
          <Main>
            <Switch>
              <Route exact path={'/'} component={HomePage} />
              <Route exact path={'/login'} component={LoginPage} />
              <Route exact path={'/register'} component={RegisterPage} />
              <Route path={'*'} component={NotFoundPage} />
            </Switch>
          </Main>
          <Footer />
        </Router>
      </ErrorBoundary>
    </div>
  )
}

export default App

const Main = styled.div`
  padding: 3rem 10rem;
  flex: 1;
`
有几个小 tips。
- 这边我把
Header和Footer放置在Route的外侧作为两个固定渲染的组件,因为就目前需求而言,这两个组件每个页面都会用到。 - 在写路由的时候在外侧包裹
Switch的原因保证只会渲染一个路由,加上exact关键字是为了实现精确匹配(避免/login匹配到/)。 - 把 404 组件的路由项放到最后一个,保证只有在无法匹配到已有路由时才会显示该界面。
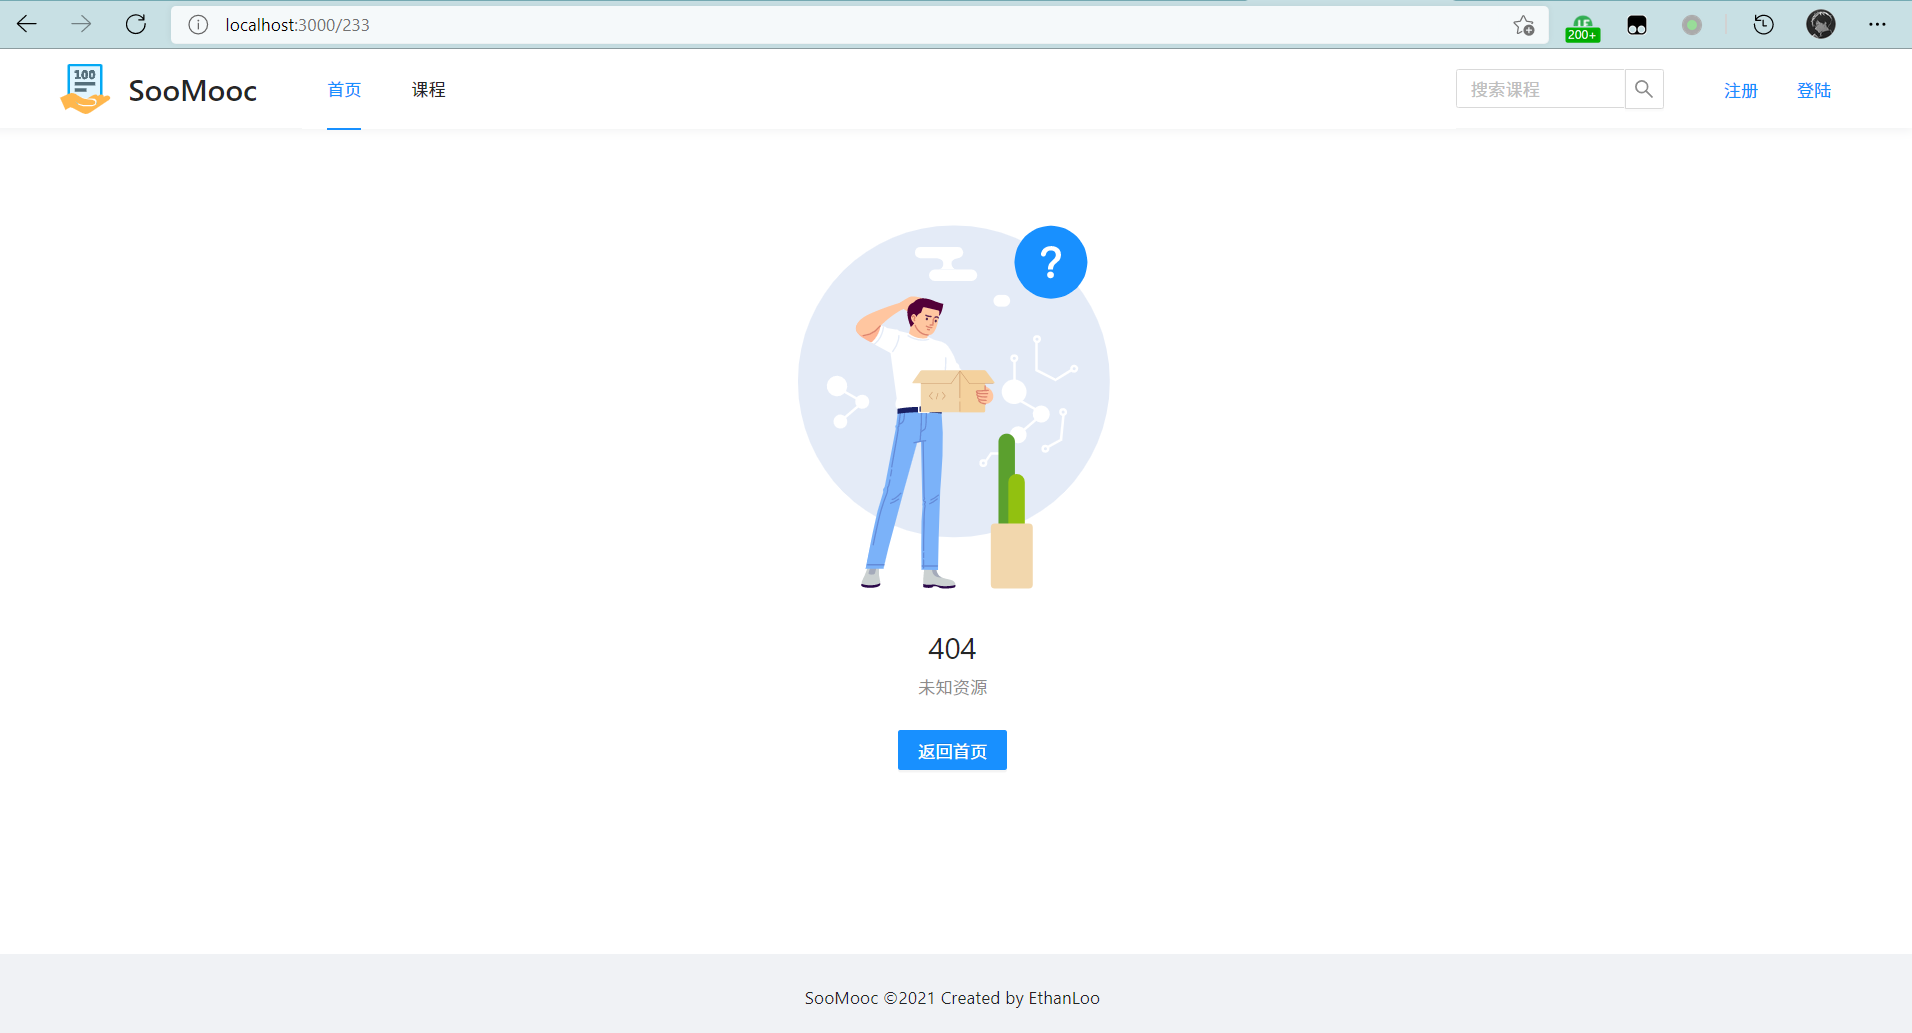
404 界面效果图:
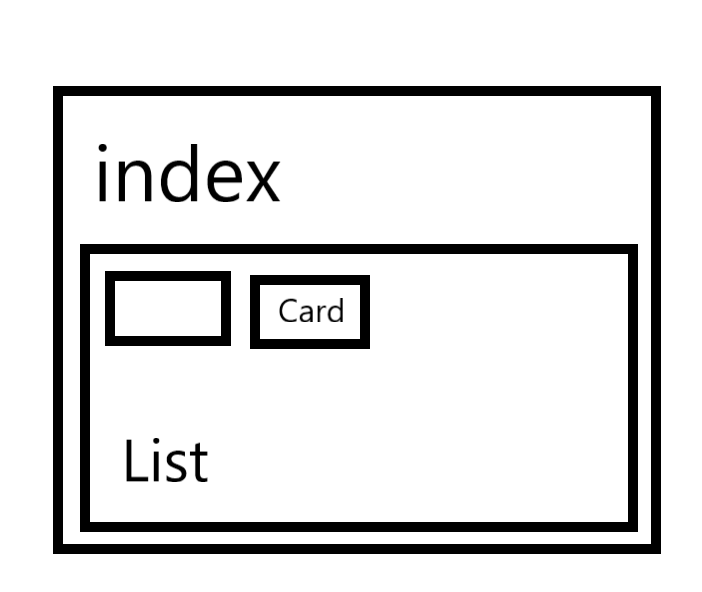
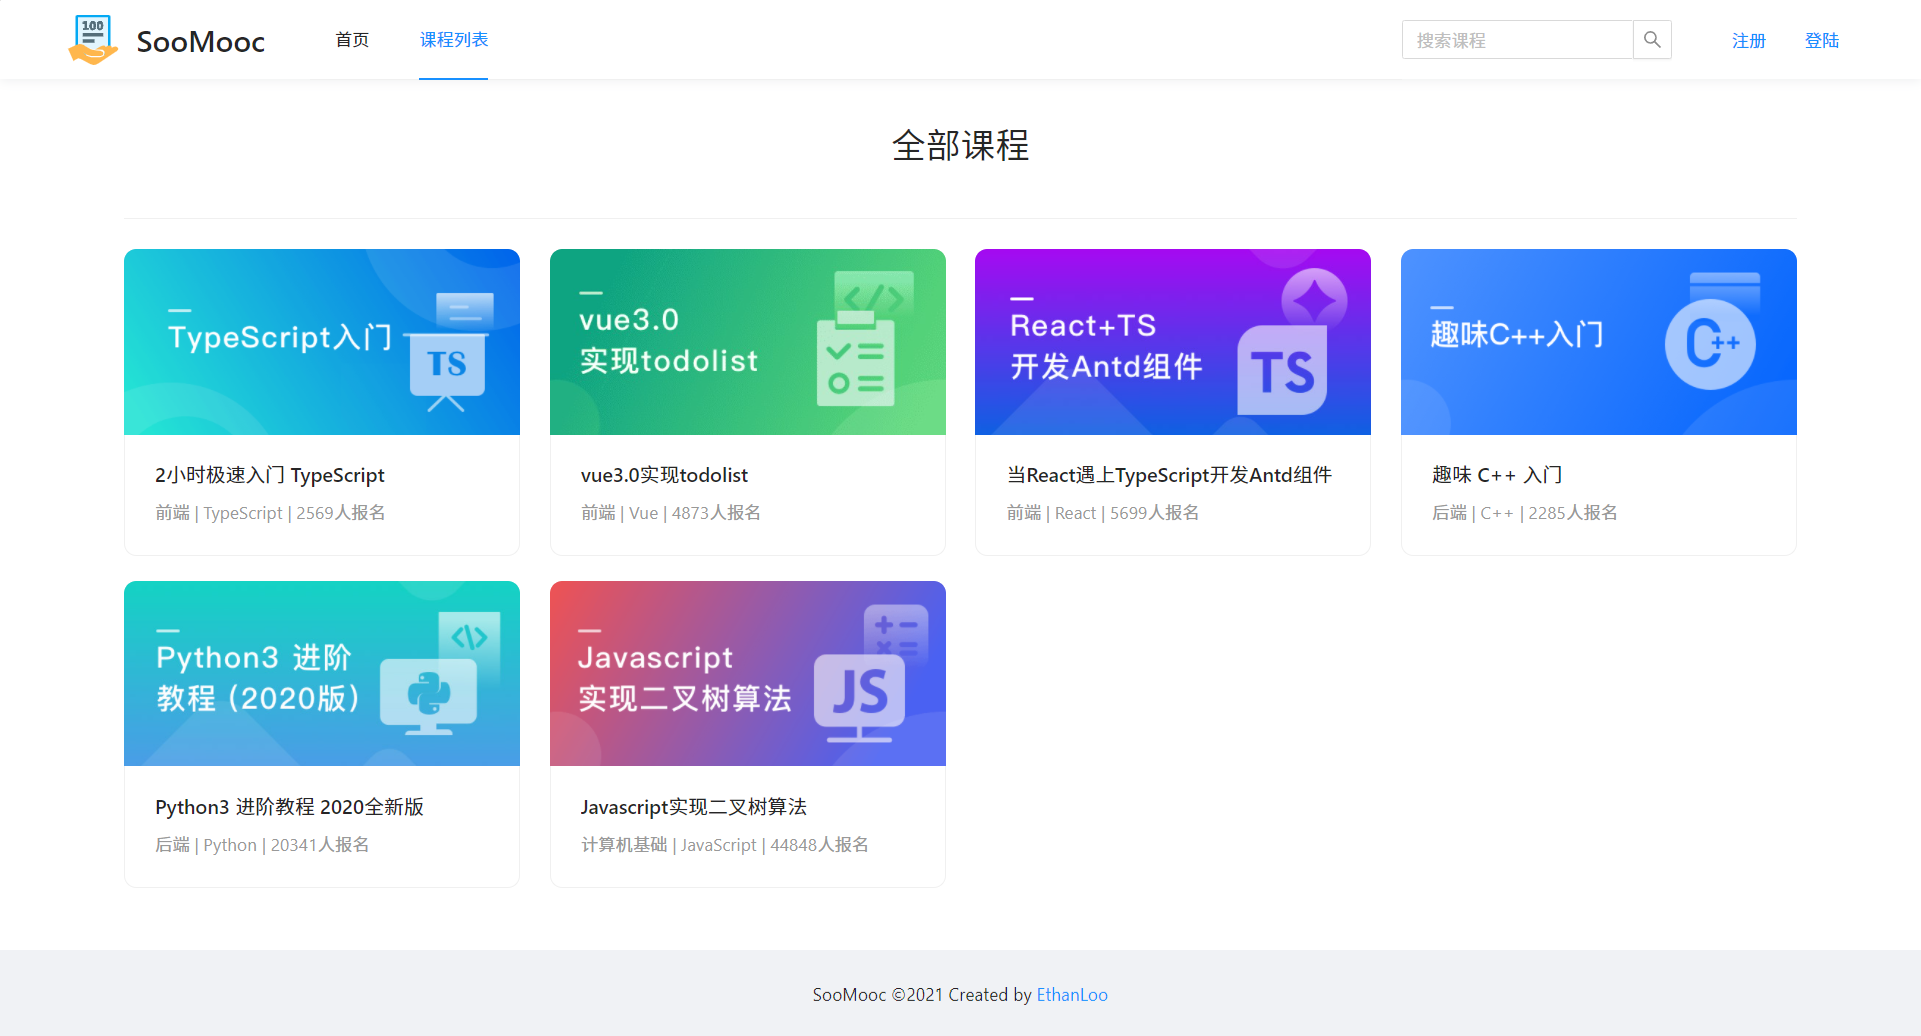
课程列表组件
为了更加能够通过更加真实的体验去了解路由配置的过程,我决定先把课程相关的界面大致写出来。
在 src/screens 下新建两个文件夹,course 文件夹中存放课程详情界面的组件,course-list 文件夹中存放课程列表的组件。
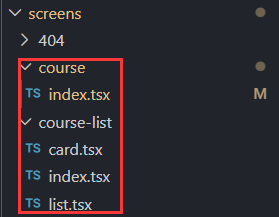
先把复杂的课程列表写完,包含三个组件 card.tsx 用来以卡片格式展示某个课程的信息,index.tsx 用来渲染整个课程列表界面,list.tsx 用来组织课程列表。
在定义 Course(课程类) 的数据结构时,由于课程应该是公用,所以我将其提取到 src/type/course.ts 中(新建)。
接下去编写最外层的框架 index.tsx,写一个组件 CourseListScreen 。
该组件需要完成的功能很简单,展示页面的标题,获取所有的课程信息,并且渲染 course-list.tsx 中的 CourseList 组件。
import { useEffect, useState } from 'react'
import { Course } from 'type/course'
import { useHttp } from 'utils/http'
import { CourseList } from './list'
import { Divider, Row } from 'antd'

export const CourseListScreen: React.FC = () => {
  const client = useHttp()
  const [courses, setCourses] = useState<Course[]>([])
  useEffect(() => {
    client('course').then((courses) => {
      setCourses(courses)
    })
  }, [client])

  return (
    <>
      <Row style={{ justifyContent: 'center' }}>
        <h1>全部课程</h1>
      </Row>
      <Divider />
      <CourseList courses={courses}></CourseList>
    </>
  )
}
在 course-list.tsx 中,新建 CourseList 组件,利用 grid 布局,每行放最多 4 个课程的卡片。
import { Col, Row } from 'antd'
import { Course } from 'type/course'
import { CourseCard } from './card'

interface ListProps {
  courses: Course[]
}

export const CourseList: React.FC<ListProps> = ({ courses }) => {
  return (
    <>
      <Row gutter={24}>
        {courses?.map((course) => {
          return (
            <Col span={6} key={course.id}>
              <CourseCard course={course}></CourseCard>
            </Col>
          )
        })}
      </Row>
    </>
  )
}
参考慕课网的课程列表展示方式,我利用 <Card /> 组件来展示课程信息。
课程信息卡片组件收到的 props 应该包含一个课程对象,这个课程对象包含了 课程id,课程标题,封面,方向,类别,学生人数。
正常来说,点击课程的卡片就会进入课程的详情页面,所以我们在卡片外部包裹跳转链接。
import styled from '@emotion/styled'
import { Card } from 'antd'
import { Course } from 'type/course'
import { Link } from 'react-router-dom'

export const CourseCard: React.FC<{ course: Course }> = ({ course }) => {
  const { id, title, heroImage, direction, type, numberOfStudents } = course
  return (
    <Link to={`course/detail/${id}`}>
      <Card
        hoverable
        style={{
          borderRadius: 10,
          marginBottom: 20,
        }}
        heroImage={<Cover src={heroImage}></Cover>}
      >
        <Card.Meta title={title} />
        <Description>{`${direction} | ${type} | ${numberOfStudents}人报名`}</Description>
      </Card>
    </Link>
  )
}

const Cover = styled.img`
  height: 15rem;
  border-radius: 10px 10px 0 0 !important;
  object-fit: heroImage;
`
const Description = styled.div`
  margin-top: 10px;
  color: #999;
  white-space: nowrap;
  overflow: hidden;
  text-overflow: ellipsis;
`
再往 db.json 文件中加入我们需要的 mock data(拷贝于慕课网)。
"course": [
  {
    "id": 1,
    "title": "2小时极速入门 TypeScript",
    "heroImage": "//img3.mukewang.com/607fc1a4097d454805400304.png",
    "direction": "前端",
    "type": "TypeScript",
    "numberOfStudents": 2569
  },
  {
    "id": 2,
    "title": "vue3.0实现todolist",
    "heroImage": "//img4.mukewang.com/600ebd8b08a2013605400304.jpg",
    "direction": "前端",
    "type": "Vue",
    "numberOfStudents": 4873
  },
  {
    "id": 3,
    "title": "当React遇上TypeScript开发Antd组件",
    "heroImage": "//img2.mukewang.com/5fe4430e0001057c05400304.jpg",
    "direction": "前端",
    "type": "React",
    "numberOfStudents": 5699
  },
  {
    "id": 4,
    "title": "趣味 C++ 入门",
    "heroImage": "//img2.mukewang.com/606c41a60914530f05400304.png",
    "direction": "后端",
    "type": "C++",
    "numberOfStudents": 2285
  },
  {
    "id": 5,
    "title": "Python3 进阶教程 2020全新版",
    "heroImage": "//img2.mukewang.com/5fe4430f0001cbe605400304.jpg",
    "direction": "后端",
    "type": "Python",
    "numberOfStudents": 20341
  },
  {
    "id": 6,
    "title": "Javascript实现二叉树算法",
    "heroImage": "//img2.mukewang.com/5fe442fd00018a1405400304.jpg",
    "direction": "计算机基础",
    "type": "JavaScript",
    "numberOfStudents": 44848
  }
]
写完这三个组件后,我们将 CourseListScreen 组件写入 App.tsx 的路由中。
<Route exact path={'/course'} component={CourseListScreen} />
适当修改一下页头中的菜单项。
<Menu
  theme="light"
  mode="horizontal"
  selectedKeys={[pathname]}
  style={{ flex: 1 }}
  >
  <Menu.Item key={'/'}>
    <Link to={'/'}>首页</Link>
  </Menu.Item>
  <Menu.Item key={'/course'}>
    <Link to={'/course'}>课程列表</Link>
  </Menu.Item>
</Menu>
效果图如下:
记得要运行
json-server服务器哦
课程详情组件
接着继续写课程详情界面。
课程详情信息的接口如下:
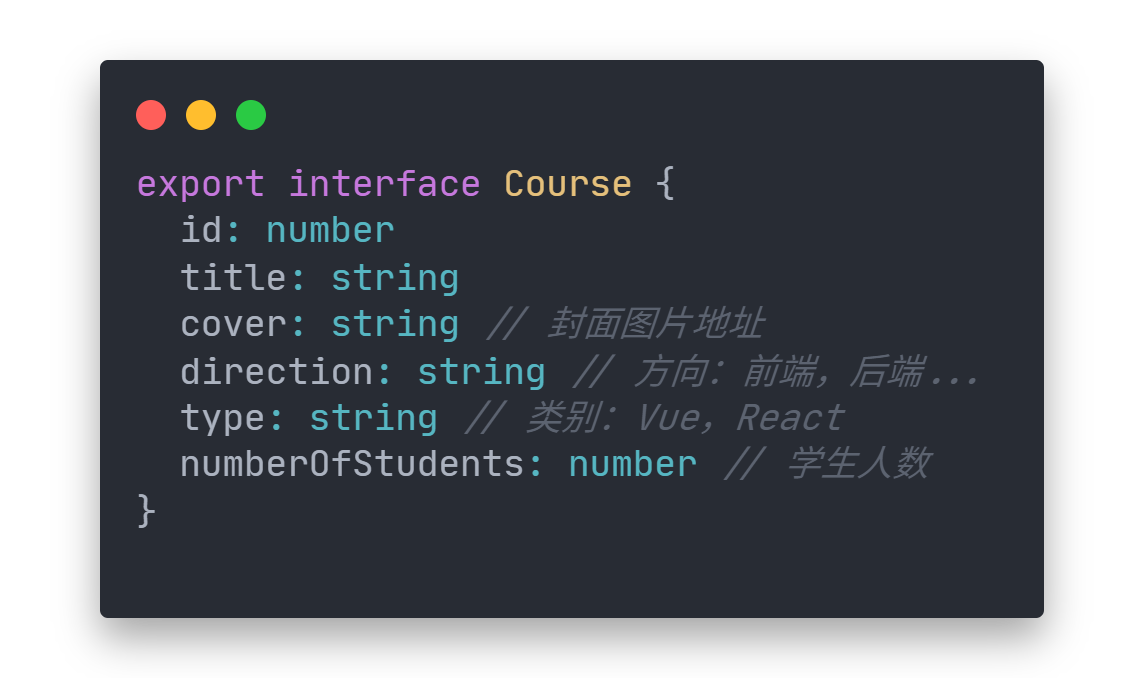
export interface CourseProps {
  id: number
  title: string
  heroImage: string // 封面图片地址
  direction: string // 方向:前端,后端...
  type: string // 类别:Vue,React
  numberOfStudents: number // 学生人数
}

export interface CourseDetailProps extends CourseProps {
  courseId: number // 对应的课程id
  info: string // 课程的详细介绍
}
先写个大概,之后根据具体设计修改。
设置 courseId 的原因是因为需要将 Course和 CourseDetail 通过外键关联起来,另一方面 json-server 自带非常好用的外键功能。
通过 /course/1/detail,我就能查找到 id 为 1 的 course 对应的 detail。
伪造数据如下:
"detail": [
  {
    "id": 1,
    "courseId": 1,
    "info": "让你通过2小时,实现 TypeScript 的从入门到精通"
  },
  {
    "id": 2,
    "courseId": 2,
    "info": "Vue 入门第一步:TodoList"
  }
]
在之前定义路由的时候,我们设计的是通过链接 course/detail/courseId 来访问课程的详情界面。
先在 App.tsx 中加入对应的路由信息。
<Switch>
  <Route exact path={'/'} component={HomePage} />
  <Route exact path={'/course'} component={CourseListScreen} />
  <Route
    exact
    path={'/course/detail/:courseId'}
    component={CourseDetailScreen}
    />
  <Route exact path={'/login'} component={LoginScreen} />
  <Route exact path={'/register'} component={RegisterScreen} />
  <Route path={'*'} component={NotFoundPage} />
</Switch>
在 src/screens/course/index.tsx 下写出大概的组件样式,并且打印出路由相关属性研究一下。
import { Divider, Row } from 'antd'
import { RouteComponentProps } from 'react-router'

export const CourseDetail: React.FC<RouteComponentProps> = (props) => {
  console.log(props.history)
  console.log(props.location)
  console.log(props.match)
  return (
    <>
      <Row justify={'center'}>
        <h1>title</h1>
      </Row>
      <Row justify={'center'}>{`direction | type | numberOfStudents`}</Row>
      <Divider />
      <Row justify={'center'}>{`info`}</Row>
    </>
  )
}
这里使用 ReactComponentProps 来声明 props 的类型包含了路由信息。
我们通过访问任意一个课程详情界面来分别研究一下这三个对象:
-
history:类型为History,存储了历史记录相关的信息,包括历史记录长度和其他 H5 规范中的 API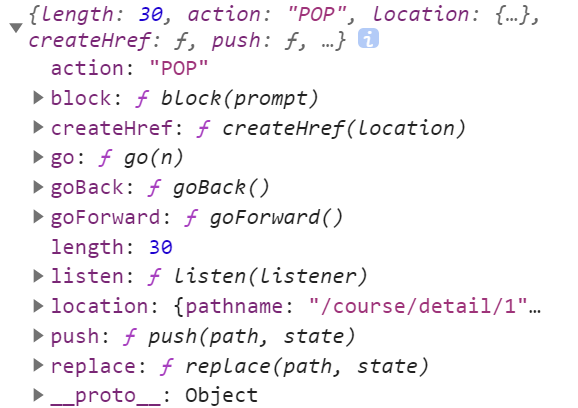
-
location:类型为Location,包含了 URL 相关信息。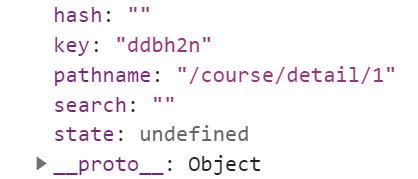
-
match:一个对象,存储了路由相关信息。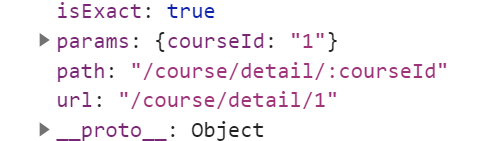
打印出来之后用哪个来定位 courseId 应该也很清楚了,显然是 match.params.courseId。
在写组件的时候遇到了一个很尬尴的问题,这是我本来写的代码。
const courseId = props.match.params.courseId
const client = useHttp()

const [courseDetail, setCourseDetail] =
      useState<CourseDetailProps | null>(null)

useEffect(() => {
  const fetchData = async () => {
    const course: CourseProps = await client(`course/${courseId}`)
    const detail: CourseDetailProps[] = await client(
      `course/${courseId}/detail`
    )
    setCourseDetail({ ...courseDetail, ...detail?.[0], ...course })
  }
  fetchData()
}, [client, courseId])
组件的逻辑是这样的:
- 将课程详情定义为一个状态,并且初始化为
null - 在
useEffect函数中,通过异步函数获取课程详情信息。 - 通过
SetState函数,设置当前的课程详情。
可以看到我写了一行代码:setCourseDetail({ ...courseDetail, ...detail?.[0], ...course }),当时我写的时候的心里想法是:
通过异步获取课程详细信息 => 解构原状态并且更新状态
但是这样写 eslint 会报警告 ⚠
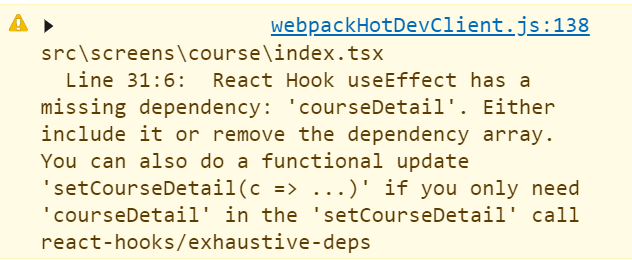
大致含义就是因为在 useEffect 里用到了外部定义的变量 courseDetail ,提示你应该将其放到依赖项中。但是因为我们在这个 useEffect 中会更新 courseDetail,所以放到依赖项中的结果就是组件会无限重新加载。
于是我便开始在网上搜索解决办法,直到我找到了这篇文章,才发现事实上 eslint 已经提示了解决办法。
有一说一,考虑到 React 的生态还是直接用英文在谷歌上搜索比较好。
setCourseDetail(c => ({ ...c,...detail?.[0], ...course }))
以回调形式的函数作为参数,避免了直接传入原状态,因此得以去掉警告。
但是话又说回来了,为什么我一定要原状态呢?该组件的逻辑难道不是只需要根据路由获取课程 id,然后异步获取课程详情并且加载吗?本质上组件只会随着页面的加载而加载,状态也只需要在加载页面的时候获取一次。这个函数完全可以不用调用原状态,写成以下样子就行了:
useEffect(() => {
  const fetchData = async () => {
    const course: CourseProps = await client(`course/${courseId}`)
    const detail: CourseDetailProps[] = await client(
      `course/${courseId}/detail`
    )
    setCourseDetail({ ...detail?.[0], ...course })
  }
  fetchData()
}, [client, courseId])
🙄 好家伙直接白忙活。
course/index.tsx 组件如下:
import { CourseBanner } from './banner'
import { Row } from 'antd'
import { FullPageLoading } from 'components/lib'
import { useEffect, useState } from 'react'
import { RouteComponentProps } from 'react-router'
import { CourseDetailProps, CourseProps } from 'type/course'
import { useHttp } from 'utils/http'

interface MatchParams {
  courseId: string
}

export const CourseDetailScreen: React.FC<RouteComponentProps<MatchParams>> = (
  props
) => {
  const courseId = props.match.params.courseId
  const client = useHttp()

  const [courseDetail, setCourseDetail] =
    useState<CourseDetailProps | null>(null)

  useEffect(() => {
    const fetchData = async () => {
      const course: CourseProps = await client(`course/${courseId}`)
      const detail: CourseDetailProps[] = await client(
        `course/${courseId}/detail`
      )
      setCourseDetail({ ...detail?.[0], ...course })
    }
    fetchData()
  }, [client, courseId])
  return !courseDetail ? (
    <FullPageLoading />
  ) : (
    <>
      <CourseBanner courseDetail={courseDetail} />
      <Row justify={'center'}>{`${courseDetail?.info}`}</Row>
    </>
  )
}
course/banner.tsx 组件用于展示课程详细信息界面的头图:
import styled from '@emotion/styled'
import { CourseDetailProps } from 'type/course'

export const CourseBanner = ({
  courseDetail,
}: {
  courseDetail: CourseDetailProps
}) => {
  return (
    <TitleContainer style={{ backgroundImage: `url(${courseDetail.heroImage})` }}>
      <Title>
        <div
          style={{ fontSize: '3.5rem', fontWeight: 600 }}
        >{`${courseDetail?.title}`}</div>
        <div
          style={{ fontSize: '1.5rem' }}
        >{`${courseDetail?.direction} | ${courseDetail?.type} | ${courseDetail?.numberOfStudents} 人正在学习`}</div>
      </Title>
    </TitleContainer>
  )
}

const TitleContainer = styled.div`
  display: flex;
  height: 20rem;
  overflow: hidden;
  background-size: heroImage;
  background-repeat: no-repeat;
`

const Title = styled.div`
  display: flex;
  flex: auto;
  flex-direction: column;
  align-items: center;
  justify-content: space-around;
  color: #fff;
  padding: 3rem 0;
  background-color: rgba(0, 0, 0, 0.4);
  backdrop-filter: blur(20px);
`
当前效果如下: